Showing posts with label garden project. Show all posts

Simple garden hose guide & plant protector [Redux]

[With hot summer weather causing me to do a little more hand-watering than usual, I've realized that I need to make a few more of my DIY hose guides. Here's a "rerun" of the original post on my past garden project. Happy gardening!]

One of my greatest passions, and best forms of therapy, outside of work is my garden. Although the entire garden is most often watered by a timer- operated irrigation and drip system, occasionally there is a need to do extra watering using the garden hose. I always hate to be dragging the hose across the driveway, sidewalk or patio and have it attempt to decapitate plants in the garden.

I've looked at various hose guides at garden stores and I'm just too cheap to pay what is asked. I'd heard of people making the guides using lengths of pipe with ornamental lamp finials on top. Again, most lamp finials I like are too expensive for me to use in such a manner. A few weeks ago at Lowe's I found some aged bronze swirl drawer pulls on sale for $1.28 a piece - and I'd discovered my hose guide ornaments. So, with a 37-cent copper cap, a $1.42 piece of rebar, and about $1.00 worth of copper pipe, I had my hose guide materials for just over $4.00.

The materials needed for one hose guard (shown above) are:

• 1 piece of 1/2 inch copper pipe cut to 10 inches in length

• 1 copper cap for 1/2 inch pipe

• 1 piece of 3/8 inch rebar cut to 24 inches in length

• 1 ornamental brass or bronze drawer pull

• 1 metal screw (comes with drawer pull)

The tools needed include:

• a tape measure

• a handheld pipe cutter (available at the hardware store)

• a hacksaw (to cut the rebar and screw)

• an electric drill

• the necessary solder and soldering equipment

• steel wool, sandpaper or a tool made for roughing up the pipe surfaces to be joined

• a container of flux and the necessary brush for "painting" it on the copper tubing

• a pair of gloves with a non-skid palm surface for assistance in holding the pipe while it is being cut

The project process was actually fairly simple. The most effort was required in cutting the rebar and copper pipe to the proper lengths. It was also necessary to cut the screw that came with the drawer pull to about half of its length.

I used an electric drill to create a hole in the copper cap to screw on the drawer pull. Once the drawer pull was tightly screwed onto the cap, Ed soldered the screw in place within the cap to prevent movement (you could super glue the screw in place if desired). He then soldered the copper cap to the 10-inch length of copper pipe (again, you could super glue it on for ease).

I then stuck the piece of rebar into the ground, at the corner of the flower bed, until 10 inches of the rebar was left above the surface. The copper pipe fit over the rebar and my "designer" hose guide was in place. In a little less than an hour I had three custom hose guides completed and installed in my garden.

Note: You might also want to check out my flower pot umbrella stand and copper pipe garden trellis projects.

© 2012 Jeff Fisher LogoMotives

How does the garden grow?: The challenge of replacing my winter-damaged ceramic planters

Several years ago, in a search to find planters for the front porch of my home, my friend Mike Smith - co-owner of Joy Creek Nursery - took me to a garden pottery wholesaler. I was thrilled to find three large ceramic pots that perfectly matched the purple of the front door (below). Over the next few summers the planters were filled with purple fountain grass, purple and green sweet potato vines, pansies and more. During the winter months the vessels were often planted with a variety of kale.

Following the cold and icy winter of 2009, I noticed fine cracks beginning to appear in the surface of the pots. A few small pieces of the purple finish even began to fall off. Fortunately, the seasonal vegetation in the planters covered the increasing flaws.

This past winter the planters began to fail even more. Large portions of the finish began to fall away from the pots after another unusually cold winter (above). The search for replacements began.

With friends and neighbors complaining about winter damage to their own planters, I started looking for substitutes that might better handle the elements. I must have looked at every fiberglass, resin and concrete planter made on websites, at home improvement stores and at nurseries. Most were fake in appearance, too shiny, poorly designed or just plain ugly.

The arrival of my Crate & Barrel catalog resulted in a couple of possible solutions. One, a bronze option, came with the disclaimer "bring indoors during freezing temperatures." Right - I don't think so. The other was a bit more intriguing to me - a tall, square zinc planter with a shallow insert for plantings.

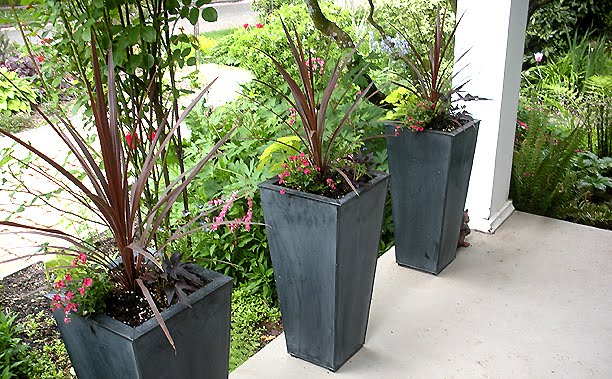
After a visit to the local Crate & Barrel, three of the planters appeared on the porch (above). Ed, my partner of over two decades, suggested feeding drip line sprinkler lines up through the drainage holes in the pots and inserts. I then smashed the old, purple ceramic pots with a hammer; using the pieces to weight down the bottom portions of my new porch decor. After doing so, I had to go plant shopping.

Most of what I planted in the pots came from another favorite local nursery - Marbott's. Spiky Cordyline australis is the centerpiece of each planter. They are surrounded by Blackie sweet potato vine, Blue Picotte Lobelia, the almost chartreuse Marguerite sweet potato vine and Antique Red Diascia. I look forward to the pots filling in as spring progresses - and seeing how the planters survive the changing seasons.

Note: You might want to check out my flower pot umbrella stand, hose guide and copper pipe garden trellis projects. I also have a regularly updated Flickr photo gallery of images from my garden

© 2011 Jeff Fisher LogoMotives

Simple garden hose guide and plant protector [Redux]

[With spring gardening in full swing, for those not currently under water or still covered with snow, I've had several requests for information about my hose guide project. Here's a "rerun" of the original post. Happy gardening!]

One of my greatest passions, and best forms of therapy, outside of work is my garden. Although the entire garden is most often watered by a timer- operated irrigation and drip system, occasionally there is a need to do extra watering using the garden hose. I always hate to be dragging the hose across the driveway, sidewalk or patio and have it attempt to decapitate plants in the garden.

I've looked at various hose guides at garden stores and I'm just too cheap to pay what is asked. I'd heard of people making the guides using lengths of pipe with ornamental lamp finials on top. Again, most lamp finials I like are too expensive for me to use in such a manner. A few weeks ago at Lowe's I found some aged bronze swirl drawer pulls on sale for $1.28 a piece - and I'd discovered my hose guide ornaments. So, with a 37-cent copper cap, a $1.42 piece of rebar, and about $1.00 worth of copper pipe, I had my hose guide materials for just over $4.00.

The materials needed for one hose guard (shown above) are:

• 1 piece of 1/2 inch copper pipe cut to 10 inches in length

• 1 copper cap for 1/2 inch pipe

• 1 piece of 3/8 inch rebar cut to 24 inches in length

• 1 ornamental brass or bronze drawer pull

• 1 metal screw (comes with drawer pull)

The tools needed include:

• a tape measure

• a handheld pipe cutter (available at the hardware store)

• a hacksaw (to cut the rebar and screw)

• an electric drill

• the necessary solder and soldering equipment

• steel wool, sandpaper or a tool made for roughing up the pipe surfaces to be joined

• a container of flux and the necessary brush for "painting" it on the copper tubing

• a pair of gloves with a non-skid palm surface for assistance in holding the pipe while it is being cut

The project process was actually fairly simple. The most effort was required in cutting the rebar and copper pipe to the proper lengths. It was also necessary to cut the screw that came with the drawer pull to about half of its length.

I used an electric drill to create a hole in the copper cap to screw on the drawer pull. Once the drawer pull was tightly screwed onto the cap, Ed soldered the screw in place within the cap to prevent movement (you could super glue the screw in place if desired). He then soldered the copper cap to the 10-inch length of copper pipe (again, you could super glue it on for ease).

I then stuck the piece of rebar into the ground, at the corner of the flower bed, until 10 inches of the rebar was left above the surface. The copper pipe fit over the rebar and my "designer" hose guide was in place. In a little less than an hour I had three custom hose guides completed and installed in my garden.

Note: You might also want to check out my flower pot umbrella stand and copper pipe garden trellis projects.

© 2011 Jeff Fisher LogoMotives

Garden Prototype: The quest to build a stronger, attractive and more practical tomato (or dahlia) cage

I've never been a big fan of the traditional wire tomato cages. Most are too flimsy, or too short, and will fall over when a tomato plant is loaded with the fruit of the vine. (In fact, I have a leaning tower of tomatoes in one part of my garden right now.) The circular cages have always created a storage challenge for me, too. I've never used the collapsible square cages - which in some case do have height extensions - but they still look like...well, tomato cages.

In my own garden, tomatoes and other vegetables are mixed in with the perennials, annuals and shrubs to take the greatest advantage of the sun in the front and back of the house. The usual tomato cage is not always the most attractive garden element. In the past, I've also used tomato cages in flower beds to help support dahlias that grow to five or six feet tall. I decided to play around with an idea for a better - and more attractive - cage for the tomatoes and dahlias. I was hoping for something that might convey the appearance of garden art, in addition to serving a practical purpose.

I sketched out my rough idea (above) for a prototype of a possible functional and artistic tomato cage. My idea was to make individual panels (below left) made of rebar that could be used in groups of three or four pieces to support plants. By reversing the manner in which panels were put into the ground, the supporting cross-bars would be at different levels on which vines could rest. A simple copper ring, cut from plumbing pipe, would hold the panels together at the top and provide added support to the structure (below right).

Materials needed for each panel of my prototype:

• 2 pieces of 3/8" rebar cut to 48" long

• 3 pieces of 3/8" rebar cut to 18" long

• Pieces of 1" copper plumbing pipe cut to 2" lengths

• Welding equipment - or friend/relative who welds

I handed my prototype doodle off to my partner Ed and, with rebar purchased for a few dollars, he and his father fabricated four of my cage panels as designed. With a hacksaw I cut four 2-inch copper pieces from plumbing pipe leftovers we had around the house. My initial tomato cage was easily installed in my garden (below left).

A couple months later, with the tomato plant growing well around and on the cage, I have a better idea of how I might refine my original design. The welds need to be a bit stronger, as a couple have come loose under the weight of the vines. I would most likely expand the height of the cages by using five or six foot pieces of rebar; rather than the 4-foot lengths used. I do really like the rusty patina that has developed on the rebar with exposure to the elements and sprinklers. It gives the cage more of a garden art appearance. To finalize my design, in the future, I would probably replace the copper pipe collars I used with copper caps using lamp finials or drawer/cabinet pulls (as I did with my previous garden hose guard project).

One of the reasons I designed the tomato cage as I did, was to make removal and winter storage easy. Individual panels can easily be stacked in a garden shed or garage. However, I may just leave the cage in place after the plant has died away to give the garden some visual interest during the off-season.

Note: You might also want to check out my flower pot umbrella stand and copper pipe garden trellis projects.

© 2010 Jeff Fisher LogoMotives

Garden umbrella takes a stand - in flower pot [Redux]

[One of my most popular bLog-oMotives entries the past two summer did not feature a graphic design topic. Instead it involved a garden design project. At the time, my instructions for a flower pot patio umbrella stand ended up on the homepage of Apartment Therapy. Then it was mentioned on the blog Life on the Balcony, resulting in a lot of traffic coming my way. Google searches are now bringing a lot of readers to my instructions for this project. I've also had several email requests for the information - so, here it is again.]

My increasingly gorgeous North Portland garden does need some urgent care this week. Things are growing out of control and I hope to take advantage of some "garden therapy" several times in the next few days. Funny, since LeAnn Locher wrote about my garden in Just Out this past month, quite a few people have been inviting themselves over for viewings. (LeAnn recently posted some additional photos on her Flickr page.) We've also been enjoying numerous dinners with friends out on the backyard patio.

Until quite recently I had paid little attention to the tumbled paver patio in front of the house. Initially created to eliminate the last patch of lawn in our garden, the patio had remained empty for almost a year. One of the ideal aspects of the patio space is that it is completely private from the street due to the growth of the plantings behind a curved retaining wall. In fact, walkers passing by on the sidewalk below, while commenting on the garden, most often are unaware I am up on the higher portion of the front yard.

I knew I wanted a couple somewhat traditional Adirondack chairs and a small table for the outdoor room. I also felt a garden umbrella was needed to shade the seating area in the mid-afternoon when hot, direct sunlight was a factor. Still, I didn't want your average, clunky umbrella stand in my front patio decor. When I came across some large pottery flower pots I knew I had my umbrella stand solution - I just needed to wait for the pots to go on sale. I couldn't possibly pay retail. I hate to pay retail.

A couple weeks later the pot I had my eye on went on clearance - and I had an additional 20% off coupon. My umbrella stand project could begin.

The materials needed for one flower pot umbrella stand (shown above right) are:

• 1 large, heavy flower pot - a minimum of 18" to 24" tall

• 1 piece of 2 inch PVC plumbing pipe - cut 2 inches shorter than the depth of the flower pot

• 1 metal plumbing flange to fit 2 inch pipe

• 1 transitional "screw-on thingy" to add to the flange allowing for the PVC pipe to fit into flange

• Rocks, gravel or crushed concrete - enough to fill flower pot to about 6 inches below lip of pot

• Potted annuals or perennials in 6 inch pots - enough to circle around top of large flower pot

• Metal peg or nail (optional)

The tools needed include:

• a tape measure

• a hacksaw (to cut the PVD pipe)

• an electric drill (optional)

Measure the depth of the large flower pot and subtract two inches. This will give you the length needed to cut the PVC pipe with the hacksaw. Screw the transitional "thingy" onto the flange, place the PVC pipe into the transitional "thingy" and place the combined pieces into the large flower pot (as shown above in the second panel from the left)

(As an optional step, I then measured 2 inches down from what would be the top of the exposed pipe and drilled a hole through both sides of the pipe. I placed the umbrella pole into the pipe, marked the location of the holes in the pipe and drilled a hole of the same size through the umbrella pole. This will allow me to slip a metal peg, or large nail, through the pipe and pole to prevent the umbrella from possibly taking flight in a strong wind.)

I then began to fill the flower pot with some crushed concrete - remnants of our past deck backyard deck project. With about 4-5 inches of concrete in the pot I repositioned the pipe/flange contraption so it was centered (above, center photo). I then continued to fill the pot with crushed concrete until I had reached a level about 6 inches from the lip of the flower pot. (above, second photo from right).

After leveling out the crushed concrete in the flower pot I placed seven 6 inch pots of flowers and vegetation in the large flower part and around the pole (above, far right). My flowering garden umbrella stand was complete. All I had to do was place the umbrella in the stand and arrange the rest of my garden furniture (below).

I purchased the Adirondack chairs, small table and umbrella on clearance, with a 10% off total purchase coupon from Cost Plus World Market. All the plumbing pieces used to make the stand came from a nearby Lowe's, but could probably be found at any hardware store. The large flower pot, as well as the smaller one and all the plants, were purchased on clearance - with additional coupon discounts - at a neighborhood store. My entire new patio decor project cost me just under $300.

I have enjoyed sitting out on the patio, working on my PowerBook, listening to the garden critiques from unsuspecting passersby.

Note: You might also want to check out my copper and bronze hose guard and copper pipe garden trellis projects.

© 2010 Jeff Fisher LogoMotives

A simple garden trellis project [Redux]

The renovation of our garden continues. When Joy Creek Nursery had to remove an old rhododendron from what will become an outdoor kitchen area, a beautiful purple clematis lost its natural trellis. The old rhody found a new home out in the Joy Creek gardens, after being the model for a pruning class. The clematis, and several other plants, sat above ground, basically bare root, for a couple months before finding new homes among the revised hardscape.

I couldn't find trellises that I liked for the clematis. Most cost several hundred dollars and had patterns I didn't really want incorporated into our gardenscape. I roughed out a design on my computer for a set of trellises to be made out of copper pipe. My partner, Ed, previously made an arbor in a similar manner several years ago when he was practicing his copper pipe work prior to re-plumbing our home.

The trellises were designed to be approximately five feet wide and stand a total of five feet above the surface of the garden bed.

The materials needed for one trellis are:

• 8 pieces of 1/2 inch copper pipe cut to 24 inch lengths (you will want to use the thickest 1/2 inch pipe for added strength)

• 8 pieces of 1/2 inch copper pipe cut to 20 inch lengths

• 2 pieces of 1/2 inch copper pipe cut to 12 inch lengths

• 2 copper corner joints for 1/2 inch pipe

• 10 copper "tee" joints for 1/2 pipe

• 2 pieces of 3/8 inch rebar cut to 4 foot lengths

• 1 piece 1/4 inch copper tubing 5 feet in length

• 2 small metal screws 1/2 to 5/8 inches in length

The tools needed include:

• a handheld pipe cutter (available at the hardware store)

• the necessary solder and soldering equipment

• steel wool, sandpaper or a tool made for roughing up the pipe surfaces to be joined

• a container of flux and the necessary brush for "painting" it on the copper tubing

• a pair of gloves with a non-skid palm surface for assistance in holding the pipe while it is being cut

I cut all the copper lengths. On the flat surface of my patio, I then prefit all the pieces together to make sure all were correct and my trellis was going to be square. Ed then help me rough up all services that were to be soldered, but flux on both surfaces to be joines and soldered the frame at each joint. (many home improvement websites and books have great detail about the soldering process.)

I then formed the 5 foot length of 1/4 copper tubing into a spiral shape to serve as the centerpiece design element of the trellis. Spirals and swirls are patterns that have been repeated throughout our home in light fixtures, switchplate covers, light fixtures, fabrics, glassware, eating/serving utensils, dishes, interior art, garden art and elsewhere. Where the tubing was to meet the frame, I crimped the tubing flat with plyers and then drilled a hole (just smaller than the selected screws) through the flattened tupping and the "tee" joint where the swirl would be joined to the frame. The swirl was then screwed tightly into place.

Two pieces of rebar were then stuck about 1 foot into the ground at the distance determined by the width of the finished trellis. The finished trellis end pieces, or legs, where then forced over the rebar and pushed down to ground level. The previously homeless clematis was then planted in front of the trellis and I wove the new growth through the copper trellis frame.

The process was then duplicated for a second matching trellis. The plants seem very happy with their new homes - and I have trellises that also serve as garden art. I was thrilled that the finished trellises cost about $50 a piece in materials - due in part to the fact we already had the soldering supplies in our personal tool library - and were only a project of a few hours.

Note: You might also want to check out my copper and bronze hose guard and flower pot patio umbrella stand projects.

© 2010 Jeff Fisher LogoMotives

How my garden does grow

Yesterday I spent some time getting some garden therapy. Over the course of the summer plants throughout my garden have grown like crazy. I think I'll need a machete when it comes to cutting some things back in preparation for winter.

Back in mid-April I posted a bLog-oMotives entry about the little two hour gardening project that came about as a result of deciding not to spend $1000 on a water feature in one flower bed. (Top photo: April; lower photo: September) In fact, I spent no money at all in landscaping the area. All the materials used in the bed were either moved from other overcrowded parts of my garden, or the result of dividing some larger plants. With the initial planting things looked a bit bare. I knew that would change in a relatively short period of time.

Several hostas, a sedum and fuschias quickly filled in much of the bed. (Left photo: April; right photo: September) Black mondo grass, a black fern, a saxifraga, a Veronica ground-cover, an ornamental thistle, some calla lilies and moss roses added color, texture and variety. Then the begonia that wants to eat North Portland filled in any bare space.

The only disappointment in the bed is a supposedly hardy gardenia. Of the five originally placed in my garden two are thriving (one is in its second year), two appear to be diseased (including the one in my newest bed) and one did not survive.

In the two inner patio corners of the bed are my homemade copper hose guides. I wrote a "how-to" bLog-oMotives entry about the hose guides back in June.

It was a beautiful fall day to be out gardening. I even began the process of raking leaves that had fallen from our pink dogwood. Suddenly, I was attacked and covered by a swarm of yellowjackets. I was doing a far from graceful "get naked" dance as I ran to the house, tearing off my insect covered clothing. By the time I got into the kitchen I was just wearing my briefs and still had yellowjackets in my hair and flying around me. Somehow I got only three stings - one in my ear, one behind my knee and one on my shin. I did have a minor immediate allergic reaction, but soon felt nothing but intense pain in my swelling ear.

Later in the evening we discovered that the yellowjackets had built a nest in the drainage hole of half a wine barrel planted with mint for our mojito-making. Ed stuck a cork in the opening and proceeded to flood out the nest throughout this morning.

I hope that with continuing great fall weather I will be able to enjoy additional days of garden therapy without requiring any medical attention, allergy drugs or painkillers.

©2008 Jeff Fisher LogoMotives

A garden umbrella takes a stand - in a flower pot

My increasingly gorgeous North Portland garden does need some urgent care this week. Things are growing out of control and I hope to take advantage of some "garden therapy" several times in the next few days. Funny, since LeAnn Locher wrote about my garden in Just Out this past month, quite a few people have been inviting themselves over for viewings. (LeAnn recently posted some additional photos on her Flickr page.) We've also been enjoying numerous dinners with friends out on the backyard patio.

Until quite recently I had paid little attention to the tumbled paver patio in front of the house. Initially created to eliminate the last patch of lawn in our garden, the patio had remained empty for almost a year. One of the ideal aspects of the patio space is that it is completely private from the street due to the growth of the plantings behind a curved retaining wall. In fact, walkers passing by on the sidewalk below, while commenting on the garden, most often are unaware I am up on the higher portion of the front yard.

I knew I wanted a couple somewhat traditional Adirondack chairs and a small table for the outdoor room. I also felt a garden umbrella was needed to shade the seating area in the mid-afternoon when hot, direct sunlight was a factor. Still, I didn't want your average, clunky umbrella stand in my front patio decor. When I came across some large pottery flower pots I knew I had my umbrella stand solution - I just needed to wait for the pots to go on sale. I couldn't possibly pay retail. I hate to pay retail.

A couple weeks later the pot I had my eye on went on clearance - and I had an additional 20% off coupon. My umbrella stand project could begin.

The materials needed for one flower pot umbrella stand (shown above right) are:

• 1 large, heavy flower pot - a minimum of 18" to 24" tall

• 1 piece of 2 inch PVC plumbing pipe - cut 2 inches shorter than the depth of the flower pot

• 1 metal plumbing flange to fit 2 inch pipe

• 1 transitional "screw-on thingy" to add to the flange allowing for the PVC pipe to fit into flange

• Rocks, gravel or crushed concrete - enough to fill flower pot to about 6 inches below lip of pot

• Potted annuals or perennials in 6 inch pots - enough to circle around top of large flower pot

• Metal peg or nail (optional)

The tools needed include:

• a tape measure

• a hacksaw (to cut the PVD pipe)

• an electric drill (optional)

Measure the depth of the large flower pot and subtract two inches. This will give you the length needed to cut the PVC pipe with the hacksaw. Screw the transitional "thingy" onto the flange, place the PVC pipe into the transitional "thingy" and place the combined pieces into the large flower pot (as shown above in the second panel from the left)

(As an optional step, I then measured 2 inches down from what would be the top of the exposed pipe and drilled a hole through both sides of the pipe. I placed the umbrella pole into the pipe, marked the location of the holes in the pipe and drilled a hole of the same size through the umbrella pole. This will allow me to slip a metal peg, or large nail, through the pipe and pole to prevent the umbrella from possibly taking flight in a strong wind.)

I then began to fill the flower pot with some crushed concrete - remnants of our past deck backyard deck project. With about 4-5 inches of concrete in the pot I repositioned the pipe/flange contraption so it was centered (above, center photo). I then continued to fill the pot with crushed concrete until I had reached a level about 6 inches from the lip of the flower pot. (above, second photo from right).

After leveling out the crushed concrete in the flower pot I placed seven 6 inch pots of flowers and vegetation in the large flower part and around the pole (above, far right). My flowering garden umbrella stand was complete. All I had to do was place the umbrella in the stand and arrange the rest of my garden furniture (below).

I purchased the Adirondack chairs, small table and umbrella on clearance, with a 10% off total purchase coupon from Cost Plus World Market. All the plumbing pieces used to make the stand came from a nearby Lowe's, but could probably be found at any hardware store. The large flower pot, as well as the smaller one and all the plants, were purchased on clearance - with additional coupon discounts - at a neighborhood store. My entire new patio decor project cost me just under $300.

I have enjoyed sitting out on the patio, working on my PowerBook, listening to the garden critiques from unsuspecting passersby.

Note: Thanks to Apartment Therapy for featuring this project on their site.

© 2008 Jeff Fisher LogoMotives

A simple garden hose guide and plant protector

One of my greatest passions, and best forms of therapy, outside of work is my garden. Although the entire garden is most often watered by a timer- operated irrigation and drip system, occasionally there is a need to do extra watering using the garden hose. I always hate to be dragging the hose across the driveway, sidewalk or patio and have it attempt to decapitate plants in the garden.

I've looked at various hose guides at garden stores and I'm just too cheap to pay what is asked. I'd heard of people making the guides using lengths of pipe with ornamental lamp finials on top. Again, most lamp finials I like are too expensive for me to use in such a manner. A few weeks ago at Lowe's I found some aged bronze swirl drawer pulls on sale for $1.28 a piece - and I'd discovered my hose guide ornaments. So, with a 37-cent copper cap, a $1.42 piece of rebar, and about $1.00 worth of copper pipe, I had my hose guide materials for just over $4.00.

The materials needed for one hose guard (shown above) are:

• 1 piece of 1/2 inch copper pipe cut to 10 inches in length

• 1 copper cap for 1/2 inch pipe

• 1 piece of 3/8 inch rebar cut to 24 inches in length

• 1 ornamental brass or bronze drawer pull

• 1 metal screw (comes with drawer pull)

The tools needed include:

• a tape measure

• a handheld pipe cutter (available at the hardware store)

• a hacksaw (to cut the rebar and screw)

• an electric drill

• the necessary solder and soldering equipment

• steel wool, sandpaper or a tool made for roughing up the pipe surfaces to be joined

• a container of flux and the necessary brush for "painting" it on the copper tubing

• a pair of gloves with a non-skid palm surface for assistance in holding the pipe while it is being cut

The project process was actually fairly simple. The most effort was required in cutting the rebar and copper pipe to the proper lengths. It was also necessary to cut the screw that came with the drawer pull to about half of its length.

I used an electric drill to create a hole in the copper cap to screw on the drawer pull. Once the drawer pull was tightly screwed onto the cap, Ed soldered the screw in place within the cap to prevent movement (you could super glue the screw in place if desired). He then soldered the copper cap to the 10-inch length of copper pipe (again, you could super glue it on for ease).

I then stuck the piece of rebar into the ground, at the corner of the flower bed, until 10 inches of the rebar was left above the surface. The copper pipe fit over the rebar and my "designer" hose guide was in place. In a little less than an hour I had three custom hose guides completed and installed in my garden.

Note: You might also want to check out my copper garden trellis project.

© 2008 Jeff Fisher LogoMotives

No garden "tinkle box" for now

Since my partner Ed and I moved into our North Portland home over a decade ago our garden has been a constant work-in-progress - and my best therapy in escaping from my home studio. Last year a major garden renovation took place with the removal of the last bit of lawn, the installation of a new patio in front of the house, the creation of an area that will eventually become a finished outdoor kitchen, and more.

Just over a year ago things looked a little torn up in our back yard (above), as a crew from Joy Creek Nursery extended the patio and formed new flower beds. Since then a pile of leftover sand has marked where I hoped a basalt pillar water feature would be installed - with a steel "tinkle box" buried below ground level to amplify the sound of the flowing water. The entire fountain/dribbler project was estimated to cost about $1000.

With other house projects taking priority - and there are always other house projects with a 1929 home - and the need to reign in unnecessary spending like everyone else, the water feature was easily eliminated from our household budget this spring. I was tired of staring at a pile of sand outside of the back door - even though neighborhood cats were enjoying the makeshift "kitty litter box" in the middle of our garden.

This past weekend, when we actually had some spring-like weather for a few hours, I was out shoveling sand and distributing it around the yard. I found a few appropriate rocks in the supply piled on the driveway and placed them in the bed. Some bare-root plants - displaced by the recently planted aucuba - required a new home, as did the beautiful Brad Messinger pottery birdbath. Throughout the garden some "editing" of overcrowded beds was necessary, as was the dividing of other plants.

A few hostas, a black mondo grass, a hardy gardenia, and a fuchsia all found their way to the new garden space. They were joined by a black fern, a saxifraga, a Veronica ground-cover, an ornamental thistle and some later-blooming bulbs, including my favorite calla lily, Flame. One of our plastic squirrels and a piece of frog garden art made by Ed's father even found a place in the bed.

In a period of just over two hours I transformed the naked space (above) - without spending a cent. Actually, I felt as if I'd just saved myself the $1000 it would have cost for my water feature. In the afternoon I planned to make use of a couple nursery gift certificates to fill the bed in with the addition of some colorful annuals. However, with snow and freezing temperatures still in the forecast, I think I'll wait until spring finally decides to hang around for a while. The electrical outlet - in part for for the use of my PowerBook when out in my "outdoor office" - still needs to be installed, and plant growth will soon fill in the new garden bed. Still, the view from the kitchen window (above right) was greatly improved in the short period of time I was playing in the dirt.

© 2008 Jeff Fisher LogoMotives

A simple garden trellis project

The renovation of our garden continues. When Joy Creek Nursery had to remove an old rhododendron from what will become an outdoor kitchen area, a beautiful purple clematis lost its natural trellis. The old rhody found a new home out in the Joy Creek gardens, after being the model for a pruning class. The clematis, and several other plants, sat above ground, basically bare root, for a couple months before finding new homes among the revised hardscape.

I couldn't find trellises that I liked for the clematis. Most cost several hundred dollars and had patterns I didn't really want incorporated into our gardenscape. I roughed out a design on my computer for a set of trellises to be made out of copper pipe. My partner, Ed, previously made an arbor in a similar manner several years ago when he was practicing his copper pipe work prior to re-plumbing our home.

The trellises were designed to be approximately five feet wide and stand a total of five feet above the surface of the garden bed.

The materials needed for one trellis are:

• 8 pieces of 1/2 inch copper pipe cut to 24 inch lengths (you will want to use the thickest 1/2 inch pipe for added strength)

• 8 pieces of 1/2 inch copper pipe cut to 20 inch lengths

• 2 pieces of 1/2 inch copper pipe cut to 12 inch lengths

• 2 copper corner joints for 1/2 inch pipe

• 10 copper "tee" joints for 1/2 pipe

• 2 pieces of 3/8 inch rebar cut to 4 foot lengths

• 1 piece 1/4 inch copper tubing 5 feet in length

• 2 small metal screws 1/2 to 5/8 inches in length

The tools needed include:

• a handheld pipe cutter (available at the hardware store)

• the necessary solder and soldering equipment

• steel wool, sandpaper or a tool made for roughing up the pipe surfaces to be joined

• a container of flux and the necessary brush for "painting" it on the copper tubing

• a pair of gloves with a non-skid palm surface for assistance in holding the pipe while it is being cut

I cut all the copper lengths. On the flat surface of my patio, I then prefit all the pieces together to make sure all were correct and my trellis was going to be square. Ed then help me rough up all services that were to be soldered, but flux on both surfaces to be joines and soldered the frame at each joint. (many home improvement websites and books have great detail about the soldering process.)

I then formed the 5 foot length of 1/4 copper tubing into a spiral shape to serve as the centerpiece design element of the trellis. Spirals and swirls are patterns that have been repeated throughout our home in light fixtures, switchplate covers, light fixtures, fabrics, glassware, eating/serving utensils, dishes, interior art, garden art and elsewhere. Where the tubing was to meet the frame, I crimped the tubing flat with plyers and then drilled a hole (just smaller than the selected screws) through the flattened tupping and the "tee" joint where the swirl would be joined to the frame. The swirl was then screwed tightly into place.

Two pieces of rebar were then stuck about 1 foot into the ground at the distance determined by the width of the finished trellis. The finished trellis end pieces, or legs, where then forced over the rebar and pushed down to ground level. The previously homeless clematis was then planted in front of the trellis and I wove the new growth through the copper trellis frame.

The process was then duplicated for a second matching trellis. The plants seem very happy with their new homes - and I have trellises that also serve as garden art. I was thrilled that the finished trellises cost about $50 a piece in materials - due in part to the fact we already had the soldering supplies in our personal tool library - and were only a project of a few hours.

Note: You might also want to check out my copper and bronze hose guard project.

© 2007 Jeff Fisher LogoMotives